Expanded installation
Once Crystal Enterprise is up and running on one machine, run the Expand installation on other machines to add server components, create an APS cluster, increase available resources, and distribute the processing workload.
The ways in which you choose to expand your system depend largely upon your current configuration and your reporting requirements. This section provides the steps to running the Expand installation. It is strongly recommended that, before you expand your installation, you consult the Crystal Enterprise Administrator's Guide for sample configurations, general scalability considerations, information about APS clustering, and so on.
Note:
- If you are adding another APS, first set up the appropriate database client software or ODBC Data Source Name (DSN) on the local machine. The new APS must connect to the APS database in the same manner as the existing APS. Also ensure that you have the database user name (Login ID) and password that the existing APS uses to connect to the APS database. If you are unfamiliar with APS clusters, see the Crystal Enterprise Administrator's Guide.
- If you are adding another WCS, you will need to reconfigure your Web Connector so that it can communicate with both WCS machines. Once set up, the Web Connector automatically balances the Crystal Enterprise load across available WCS machines.
To expand an existing system
- Unless Autoplay is enabled for your CD-ROM drive, run setup.exe from the
win32 directory of your product distribution.
When you start the installation, the Microsoft Windows Installer may need to be installed or upgraded on the local machine. If so, the Wise Installation Wizard performs the necessary modifications and prompts you when finished. Click Yes to restart the machine and resume the installation automatically.
- Proceed through the Setup program's dialog boxes and follow the instructions displayed on your screen until you reach the Installation Type dialog box:
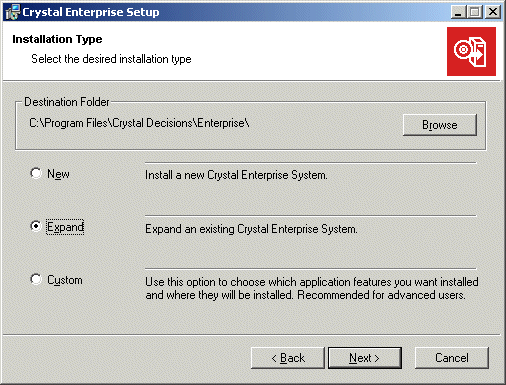
- Click Expand; then click Next.
The Expand Options dialog box appears.
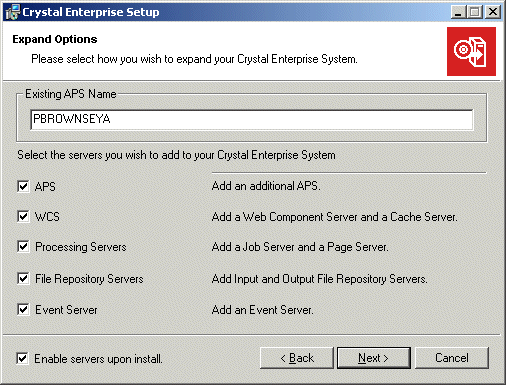
- In the Existing APS Name field, type the name of the machine that is currently running as your APS.
In this example, the APS is running on a machine called PBROWNSEYA.
- Select the check boxes that correspond to the servers that you want to add to the local machine and register with the existing APS. Clear the remaining check boxes.
The options available to you include some common server combinations. For instance, you can install a new APS and cluster it with the existing APS by selecting only the APS check box. Or, you can increase the report-processing capabilities of your system by selecting the Processing Servers check box, which adds both a Job Server and a Page Server to the local machine.
Tip: For greater control over the individual components that are installed, perform a Custom installation. For details, see Custom installation.
- Select the Enable servers upon install check box.
If you choose not to enable the servers immediately, use the Crystal Configuration Manager (CCM) to start the servers and then to enable them.
- Click Next.
- If you chose to add an additional APS, the APS database information dialog box appears. Specify the database connection type that the APS must use to connect to the existing APS database:
- If you select ODBC Database, the Windows ODBC dialog boxes appears. Select the appropriate DSN and provide the database Login ID and password. Ensure that the values you provide match the values used by your existing APS to connect to the APS database. Then click Next.
- If you select Oracle or DB2, you are prompted for the name of the database server, along with the database Login ID and password. Ensure that the values you provide match the values used by your existing APS to connect to the APS database. Then click Next.
- In the Start Installation dialog box, click Next.
The installation of files begins immediately. When the installation program has finished copying files, the final setup screen appears.
- Click Finish and, if prompted, restart the local machine.